There is a huge growing trend of people using blogging platforms like WordPress and Blogger to build websites quickly – without having any knowledge of HTML or how to make an actual website or page.
It’s great that people want to get online and build websites – and blogging has made it so much easier to do – but most people still have very little knowledge of how to make a website using HTML without the help of these blogging platforms.
But what if you want to make simple tweaks or changes to your templates? How can expand on your blog template using HTML to build a better site that fits your needs and the needs of your users.
You need to know how to make a site using HTML.
Making a basic web page using HTML

This is the first in our series “How to make a website” and will cover how to make a basic website template using HTML code.
Step 1: Creating a new HTML document
The first thing to do is actually create a new HTML document that will become our web page. For this you can use a basic text editor like Notepad, or something like Dreamweaver or Frontpage (although if you use either of these, be sure to switch to Code View and don’t use their visual editor). For this particular tutorial, I’ll be using Notepad+, which is a free piece of software designed to make it easy to make websites with HTML, PHP, or any one of a dozen other programming languages.
Open a new file and type the following code:
<!DOCTYPE html>

<html>
</html>
The <html> tag tells the browser to open the HTML document and the </html> signifies that it has been closed.
Note the !DOCTYPE before the actual HTML tag? This is required for all HTML webpages and is the recommendation implementation of the new HTML5 format. If you wanted to use HTML4.01 or XHTML you’d need to use a different declaration here.
Here are a couple of the most popular types you could use.
XHTML 1.0 Transitional
<!DOCTYPE html PUBLIC "-//W3C//DTD XHTML 1.0 Transitional//EN" "http://www.w3.org/TR/xhtml1/DTD/xhtml1-transitional.dtd">
XHTML 1.0 Strict
<!DOCTYPE html PUBLIC "-//W3C//DTD XHTML 1.0 Strict//EN" "http://www.w3.org/TR/xhtml1/DTD/xhtml1-strict.dtd">
Step 2: Add a title to your HTML document
The next step is to add a title to your document. This title will be used in the browser window, allowing your visitors to identify your site, and it will also be used in the search results pages on search engines like Google. Without it, people won’t know what your page is about.
We’ll also add a header to your page which is visible by your visitors. This is often the same as the page title, but they can be different depending on how you want to structure them.
Inside the <html> tags, add the following lines:
<head>
<title>This is an awesome site! | MyAwesomeSite.com</title>
</head>
Now we can go ahead and create a header for your page to tell people about the site. This is done using the <h1> tag. You can also use h2, h3, h4, h5 or h6 depending on what the title is and how important it is.
Here’s what you need to do:
<body>
<h1>Welcome to my awesome website!!</h1>
</body>
The <body> tags signal to the browser that this section is the main body of the page and it is required on all web pages for them to function correctly.
Inside this, we’ve put the H1 heading to welcome people to the site.
Step 3: Add some text and an image to the web page
The final step in this tutorial is to add a paragraph of text to introduce your site to the visitor and include an image for them to look at too. A picture tells a thousand words, so they say!
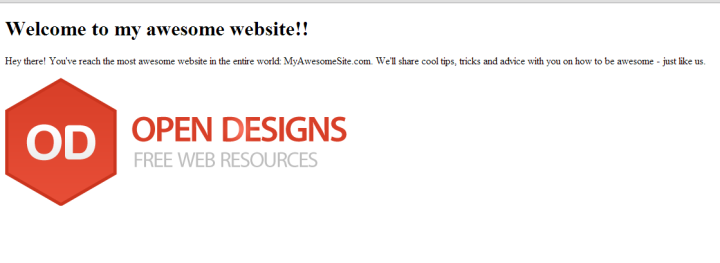
<p>Hey there! You've reached the most awesome website in the entire world: MyAwesomeSite.com. We'll share cool tips, tricks and advice with you on how to be awesome - just like us.</p>
<img src="/images/od.png" />
The <p> element is a paragraph, and is where most of your content will be. Content management systems (like WordPress) will add these in for you automatically, but it is very beneficial to know how to use them yourself to better customize your site.
The <img> tag is obviously for an image, and you can specify a source URL using src=...". Note: you need to have uploaded an image to a web server, or have access to a hosted image to do this.
Your first website using HTML

Here is all the code you need to build a very basic web page with a title, header, introductory paragraph and an image:
<!DOCTYPE html>

<html>
<head>
<title>This is an awesome site! | MyAwesomeSite.com</title>
</head>
<body>
<h1>Welcome to my awesome website!!</h1>
<p>Hey there! You've reached the most awesome website in the entire world: MyAwesomeSite.com. We'll share cool tips, tricks and advice with you on how to be awesome - just like us.</p>
<img src="/images/od.png" />
</body>
</html>
And, in case you want to see it live and working in your browser, here is a link to the example.